Wednesday, May 27, 2009
Although much work still needs to be done and even more how-to articles written, I have decided to formally open my other site, How-To Matthew. How-To Matthew will focus more on the technical how-to in the DIY realm which will free Daue Manus to be a more fluidly flowing journal of our DIY [mis]adventures! Check it out!
Friday, May 22, 2009
Fun on the Roof
We recently borrowed a very large extension ladder and one of the first jobs on our list was to do some minor roof work. Some caulk work needed to be done around the flashing on the dormer windows but we decided to also take a look at everything else while we were up there since this roof has recently gone through some very rough storms.
Here is the flashing on one of the chimneys. We will eventually need to work on this before it starts leaking.
The flashing on this chimney is less than a year old and is in good shape.
This vent's flashing will need some work as well.
Here are a couple of other views from our roof top.
What do you think, does our roof look like it is in good shape or should we be saving up time, energy, and money to replace it soon?
Monday, May 18, 2009
More Gardening Fun
With the warm Spring temperatures and lots (and lots and lots) of rain we've had recently, everything is growing rapidly.
We put this child we were watching for our friends to work planting some green beans.
Here is the space an old shack used to sit on. Now that it is gone, we can expand our garden.
Here's the raised bed I made last Saturday. Moving those railroad ties was quite a chore by myself! I also had to excavate a lot of very clay-like soil. Later in the day my wife returned home and we added top soil and left over peat moss and manure, then she planted another garden of tomatoes.
This bed was where we had a good crop of tomatoes last year. As you can see, it is full of tomato plants sprouting. These plants are "wild" offspring from last year's crop.
And our strawberries are also doing well. Some are even blossoming. You probably can't tell in this photo, but the beans the child planted a week ago are starting to come up as well.
Tuesday, May 12, 2009
Planting Raspberries
One of our projects this past Sunday was cleaning out the small area between the back of the garage and the retaining wall that marks the rear of our lot. We then filled it with a mix of dirt from the other side of the back yard where a dilapidated shed used to stand and left over peat moss and manure from our dwarf fruit tree planting project.
We now have six raspberry plants growing in what used to be an unused and unsightly corner of our yard.
Another possible benefit of these plants is that if they get nice and thick, their thorny stalks may help reduce the number of feral cats that like to stray into our yard and try to get into places they shouldn't be.
Friday, May 8, 2009
Under Construction
I am working on a completely new site for all the how-to articles that will be more user friendly, have more DIY articles, and have much more content. Duae Manus will remain as our day-to-day journal of DIY adventure.
Creating the new site is a daunting task, and in order to get it up and running in a timely fashion, there will be few new posts on Duae Manus. Stay tuned for further announcements!
Thursday, May 7, 2009
Checking and Replacing a PCV Valve
The PCV (Positive Crankcase Ventilation) valve is part of an emissions system designed to divert gasses than escape past the piston rings back to the air intake to be burned by the engine.
I will describe how to check and replace a PCV valve using my 1996 Ford Ranger as an example.
1. Locate the PCV valve. It will usually be on a valve cover or somewhere around the top of the engine.
2. Disconnect the hose from the valve.
3. Pull the valve out and shake it. It should rattle. If it doesn't rattle, the valve is plugged and needs to be replaced. Also check the hose by disconnecting it and blowing through it to check to see if it is clogged.
4. Installation is the reverse of these steps.
Replacing the PCV valve is an inexpensive maintenance item you should consider doing every few years. In the case of the Ranger with the 4.0L engine, it is a ~$2 and five minute preventative maintenance job that can keep your engine and emissions system in top shape.
Wednesday, May 6, 2009
Fixing a Leaking Sink Drain
Leaking plumbing is never fun to deal with, but at least when a drain leaks, the water is not pressurized like with a water line leak.
I recently discovered a slow leak from one of the two drains in our kitchen sink. Unfortunately, this was a drain I installed seven months ago, so I was fixing a problem I created. Ah, such is the life of a do-it-yourself person!
Find the Leak
The first step in fixing a leaking drain is determining where the leak is coming from. This may not always be as simple as finding the water droplets, because the droplets of water can travel far from the leak location before they fall to the ground. Keep in mind that water obeys the law of gravity, so if you follow a water trail up to its highest point, that will usually be the source of the leak.
The blue arrow in this photo shows where some water was collecting. The PVC pipe above was also wet. The pipes and drain to the left were completely dry, so I knew they were not the culprit. After using a flashlight, I could see that the drain itself was leaking, not the pipes.
Fixing a Leaking Sink Drain
Now that I knew what part of the drainage system under the sink was leaking, it was only a matter of fixing it before it got any worse.
Luckily for me, this was a quick fix. I would only need three things:
1. Place a large bowl or small bucket under the pipes to catch any water.
2. In order to remove the drain, I had to first unscrew the first connector (first photo).
3. Then, I removed the 'T' section of PVC pipe (second photo).
This 'T' section has a splash shield in it that prevents water coming from the left arm to splash up and out of the top opening. When reinstalling, make sure it is installed correctly.
At this time, I took the 'T' section outside and used our garden hose to flush it out and clean it. This step is not necessary, but I figured that I might as well do it while I can.
4. I now had access to the drain. The drain is attached to the bottom of the sink by a large nut. Between the nut and sink is a washer. Unscrew the large nut and place the nut and washer off to the side.
5. The drain is now free, all that has to be done is to lift it out of the sink. The plumber's putty may offer a little resistance, so if you are having trouble, try twisting the drain a little to break the putty's hold.
I have seen some people use silicone adhesive caulk instead of plumber's putty.
The silicone caulk will ensure the drain is water proof and secure, but once it adheres, you will not be able to remove the drain. This would be especially bad if your sink is like ours and is made out of solid surface material because it can lead to a cracked sink.
6. Remove all traces of old plumber's putty from both the sink and the drain. The old putty may be reused if it has not hardened.
7. Apply a bead of plumber's putty around the collar of the drain. There should be enough putty to make a good seal. When you install the drain, some putty should be squeezed out, if not, there is not enough putty.
8. Reinstall the large washer and the drain nut. Tighten. I then used a rag to clean all traces of putty in the sink. A good way to judge whether you have enough putty and the drain is tight enough is by looking at how flush the collar of the drain is to the bottom of the sink. If the collar sticks out past the bottom of the sink, then there is either too much putty or the drain has not been tightened down enough.
9. Wrap the threads of the sink drain and all the threaded portions of the PVC pipe with new Teflon tape (clean the old tape out first).
10. Reinstall the 'T' section of pipe and tighten all the fittings. That is it!
Tuesday, May 5, 2009
Under the Hood - V6 Rear Wheel Drive 1
In my Under the Hood series, I plan to photographically document the engine compartments from as many different vehicle types as possible.* I will then label the most common maintenance items and briefly explain the purpose of each component and system. My overall goal is to help those who do not know their way around an automobile's engine bay and may be intimidated by it.
In this photo, you can see the basic maintenance items common to most cars. Below is a brief description of each component outlined in this episode and, if applicable, any quick and easy maintenance checks you can perform on the component.
Engine Oil Cap - Add oil here
Engine Oil Dipstick - Use to periodically check the oil level in your engine. To check, remove the dipstick, clean it with a rag, and fully reinsert it. Remove the dipstick again and note the level of oil. If the oil is in the cross hatched area it is ok. If it is below, slowly add oil through the Engine Oil Cap until the oil level is within the cross hatched area.
Transmission Dipstick - To accurately check the level of the transmission fluid, you transmission should be at normal operating temperature. With the engine running, apply the brakes and move the gear shifter through the whole ranger of gears (i.e. P-R-N-D-2-1), waiting about 2 seconds at each gear. Move the gear shifter back to Park and check the dipstick while the engine is still idling.
Radiator - The radiator works to keep the engine from overheating. You can visually check the bottom for leaking coolant.
Radiator Cap - If the car has been used recently be very careful removing the radiator cap because the system will still be pressurized and hot steam could scald you. When in doubt, listen for a hissing sound when you turn the cap. If you hear a hissing sound, do not remove the cap. Otherwise, remove the cap and look at the coolant inside the radiator. If it is discolored (there are lots of different colors of coolant, so you will have to know the original color in order to know if the coolant's color is different) you may need to flush the cooling system. Also, make sure the radiator is full of coolant.
Upper and Lower Radiator Hoses - Visually check the hose for any cracks, holes, deterioration or any other signs of leakage.
Engine Coolant Reservoir - Check the level of coolant and make sure it is not above the "COLD MAX" line on the exterior of the reservoir.
Windshield Washer Reservoir - Check the level of the fluid against the line on the exterior of the reservoir or keep at least half full.
Fuse/Relay Boxes - To check a fuse, remove it and look through its side. If the wire connects the two prongs, it is good. If the wire is broken, the fuse is bad and should be replaced with a fuse with the same number.
Battery - Most auto parts stores can test your battery for free. Make sure the battery posts and wire terminals are clean and do not have any built-up corrosion. Corrosion will look like white, clumpy powder. To clean the posts and terminals, remove the negative terminal first, then the positive. You can use a wire brush, scrub pad, commercial battery post cleaner, or a 3:1 baking soda/water paste to scrub the battery posts and wire terminals clean. If you used any method that involved liquid or paste cleaners, allow everything to thoroughly dry before reinstalling the terminals onto the posts. Always reinstall the positive wire first, then the negative. You can smear a little petroleum jelly over the posts to help prevent future corrosion. (Note: after uninstalling the battery, the car may run slightly more rough than before because the car's computer's memory will have been reset and it will take a few miles for it to relearn its previous settings).
Air Filter Housing - The air filter is located in here. To access the air filter you will have to remove some clamps or screws (depending on the car). Pull the air filter out and visually inspect it.
Mass Air Flow Sensor (MAF) location - Inside the air intake tube (after the air filter) is the MAF. There is no regular check you can do, but if you ever need to clean the MAF due to a rough running engine, you can spray electronic cleaner spray over the wire.
Brake Fluid Reservoir - Visually check to make sure the fluid is at the proper level.
Power Steering Reservoir - Visually check to make sure the fluid is at the proper level. Some systems use a dipstick method of checking the fluid level.
Spark Plug Coil - Visually inspect for any cracks. You can also check the spark plug wires by looking for any small electrical arcs while the engine is running. You will need to do this in a dark (but well ventilated) garage or at night.
IAC Valve - If your engine in running erratically while idling, the problem may be a faulty or stuck IAC valve. To check, unplug the electrical wiring to the valve while the engine is running. If the engine's RPMs drop, the valve is working. If the engine shows no change then the IAC valve must be replaced.
Alternator - Most auto parts stores can check your alternator for free. The alternator basically converts power generated by the engine to charge the battery and run the accessories, like lights and radio. When the engine is not running, the lights and radio run off the battery.
AC Compressor - If the AC compressor constantly starts and stops but you are not getting any cold air, have the AC system checked for leaks or low refrigerant.
Serpentine Belt - Some vehicles will have one serpentine belt, some have two belts - one that drives the Air Conditioning Compressor and one that drives the Alternator, Water Pump, and Power Steering. Visually check the belts for frays, cracks or missing chunks.
* Engine bays are different between models of cars, however, most cars in the same class are similar enough that if you know your way around one you will be able to find your way around another.
This episode features a 1996 Ford Ranger with the 4.0L V6 OHV Cologne engine. Click on the photo for a higher resolution view.- Engine Oil Cap
- Engine Oil Dipstick
- Transmission Dipstick
- Radiator
- Radiator Cap
- Upper Radiator Hose
- Engine Coolant Reservoir
- Windshield Washer Reservoir
- Fuse/Relay Box
- Battery
- Air Filter Housing
- Mass Air Flow Sensor (MAF)
- Brake Fluid Reservoir
- Brake Booster
- Power Steering Reservoir
- Spark Plug Coil
- Idle Air Control Valve (IAC)
- Alternator
- AC Compressor
- Serpentine Belt
In this photo, you can see the basic maintenance items common to most cars. Below is a brief description of each component outlined in this episode and, if applicable, any quick and easy maintenance checks you can perform on the component.
Engine Oil Cap - Add oil here
Engine Oil Dipstick - Use to periodically check the oil level in your engine. To check, remove the dipstick, clean it with a rag, and fully reinsert it. Remove the dipstick again and note the level of oil. If the oil is in the cross hatched area it is ok. If it is below, slowly add oil through the Engine Oil Cap until the oil level is within the cross hatched area.
Transmission Dipstick - To accurately check the level of the transmission fluid, you transmission should be at normal operating temperature. With the engine running, apply the brakes and move the gear shifter through the whole ranger of gears (i.e. P-R-N-D-2-1), waiting about 2 seconds at each gear. Move the gear shifter back to Park and check the dipstick while the engine is still idling.
Radiator - The radiator works to keep the engine from overheating. You can visually check the bottom for leaking coolant.
Radiator Cap - If the car has been used recently be very careful removing the radiator cap because the system will still be pressurized and hot steam could scald you. When in doubt, listen for a hissing sound when you turn the cap. If you hear a hissing sound, do not remove the cap. Otherwise, remove the cap and look at the coolant inside the radiator. If it is discolored (there are lots of different colors of coolant, so you will have to know the original color in order to know if the coolant's color is different) you may need to flush the cooling system. Also, make sure the radiator is full of coolant.
Upper and Lower Radiator Hoses - Visually check the hose for any cracks, holes, deterioration or any other signs of leakage.
Engine Coolant Reservoir - Check the level of coolant and make sure it is not above the "COLD MAX" line on the exterior of the reservoir.
Windshield Washer Reservoir - Check the level of the fluid against the line on the exterior of the reservoir or keep at least half full.
Fuse/Relay Boxes - To check a fuse, remove it and look through its side. If the wire connects the two prongs, it is good. If the wire is broken, the fuse is bad and should be replaced with a fuse with the same number.
Battery - Most auto parts stores can test your battery for free. Make sure the battery posts and wire terminals are clean and do not have any built-up corrosion. Corrosion will look like white, clumpy powder. To clean the posts and terminals, remove the negative terminal first, then the positive. You can use a wire brush, scrub pad, commercial battery post cleaner, or a 3:1 baking soda/water paste to scrub the battery posts and wire terminals clean. If you used any method that involved liquid or paste cleaners, allow everything to thoroughly dry before reinstalling the terminals onto the posts. Always reinstall the positive wire first, then the negative. You can smear a little petroleum jelly over the posts to help prevent future corrosion. (Note: after uninstalling the battery, the car may run slightly more rough than before because the car's computer's memory will have been reset and it will take a few miles for it to relearn its previous settings).
Air Filter Housing - The air filter is located in here. To access the air filter you will have to remove some clamps or screws (depending on the car). Pull the air filter out and visually inspect it.
Mass Air Flow Sensor (MAF) location - Inside the air intake tube (after the air filter) is the MAF. There is no regular check you can do, but if you ever need to clean the MAF due to a rough running engine, you can spray electronic cleaner spray over the wire.
Brake Fluid Reservoir - Visually check to make sure the fluid is at the proper level.
Power Steering Reservoir - Visually check to make sure the fluid is at the proper level. Some systems use a dipstick method of checking the fluid level.
Spark Plug Coil - Visually inspect for any cracks. You can also check the spark plug wires by looking for any small electrical arcs while the engine is running. You will need to do this in a dark (but well ventilated) garage or at night.
IAC Valve - If your engine in running erratically while idling, the problem may be a faulty or stuck IAC valve. To check, unplug the electrical wiring to the valve while the engine is running. If the engine's RPMs drop, the valve is working. If the engine shows no change then the IAC valve must be replaced.
Alternator - Most auto parts stores can check your alternator for free. The alternator basically converts power generated by the engine to charge the battery and run the accessories, like lights and radio. When the engine is not running, the lights and radio run off the battery.
AC Compressor - If the AC compressor constantly starts and stops but you are not getting any cold air, have the AC system checked for leaks or low refrigerant.
Serpentine Belt - Some vehicles will have one serpentine belt, some have two belts - one that drives the Air Conditioning Compressor and one that drives the Alternator, Water Pump, and Power Steering. Visually check the belts for frays, cracks or missing chunks.
Monday, May 4, 2009
Tool Review: Dewalt DW304PK Reciprocating Saw
Occasionally I will write a review of a tool I have used. In no way do I pretend to be a professional, as this blog should show, but I also have found some of the most helpful reviews to be by "average joes" like me. All the tools I will review should be within the budget for most homeowners and weekend warriors.
Description
Reciprocating saws, sometimes called sawzalls (a trademark of the Milwaulkee brand), saws alls, recipro saws and sabre saws, are great tools for construction and demolition.
Since the saw can change blades, reciprocating saws can be outfitted to cut through just about any material, including wood and steel. This makes them very handy in demolition work where wood planks with nails or screw must be quickly cut.
So How Good is the DeWALT DW304PK Reciprocating Saw?
Priced right around $100, the DW304PK is DeWalt's entry level saw. It comes with a nice carrying case and an instruction manual. I have to admit that I toss most tool cases into storage because I find them to be, for the most part, junk, but I really do like this case. It is large enough inside to fit the saw with a long blade installed and the cord without trying to figure out how they managed to get it all to fit from the factory.
The DeWalt DW304PK is, for the most part, a fairly basic saw, but it does have some nice features:
The DeWalt's 10 Amp motor is powerful enough to cut through everything I have used it on so far. There have only been two times the saw has struggled, once when I was using the saw to quickly "disassemble" an old couch that I did not want to carry down a dangerous flight of stairs and once while cutting through a thick trunk of a shrub. The reason the saw struggled on the couch was because some of the fabric got caught in the blade clamp and started to clog the saw. The saw struggled on the trunk because the trunk was just too thick for the blade. Neither of those examples were the fault of the saw, but were my fault in the use of the saw.
Blades
Two of the features I really like about this saw regard how the saw uses blades. The first is its keyless blade clamp. Changing the blade is extremely easy and fast. The second blade feature is the 4-position blade clamp. This clamp allows you to install a blade with the serrations (cutting edge) down, up, to the left, or to the right. I have made use of this feature many times; often when working with the reciprocating saw, I would find one position in which I had the most control of the saw, but that position would not always be optimum for cutting if it were not for this clever feature. Now, I can hold the saw in the most comfortable position without sacrificing cutting efficiency.
The DeWalt DW304PK is, for the most part, a fairly basic saw, but it does have some nice features:
- 10 Amp motor
- 4-position blade clamp
- Tool less blade change
- Variable speed trigger
- 7 lb. weight
The DeWalt's 10 Amp motor is powerful enough to cut through everything I have used it on so far. There have only been two times the saw has struggled, once when I was using the saw to quickly "disassemble" an old couch that I did not want to carry down a dangerous flight of stairs and once while cutting through a thick trunk of a shrub. The reason the saw struggled on the couch was because some of the fabric got caught in the blade clamp and started to clog the saw. The saw struggled on the trunk because the trunk was just too thick for the blade. Neither of those examples were the fault of the saw, but were my fault in the use of the saw.
Blades
Two of the features I really like about this saw regard how the saw uses blades. The first is its keyless blade clamp. Changing the blade is extremely easy and fast. The second blade feature is the 4-position blade clamp. This clamp allows you to install a blade with the serrations (cutting edge) down, up, to the left, or to the right. I have made use of this feature many times; often when working with the reciprocating saw, I would find one position in which I had the most control of the saw, but that position would not always be optimum for cutting if it were not for this clever feature. Now, I can hold the saw in the most comfortable position without sacrificing cutting efficiency.
Ergonomics and Saw Control
Being the entry level, "lite" saw offering, the DeWalt DW304PK weighs in at a respectable 7 lbs. I would not call it light or heavy, but manageable. It is light enough to be used over the head for short periods of time without leading to arm fatigue but heavy enough to let you know it is well built and not flimsy.
The variable speed trigger is useful, but I usually end up squeezing the trigger all the way down as I am using the saw. It takes a little practice to get good at accurately controlling the speed, but I have not found it to detract from the overall usefulness of the saw.
What I Like
What I Dislike
Summary
I think this is the perfect saw for any homeowner or DIYer who needs a reciprocating saw for those occasional demolition or construction tasks. It is moderately inexpensive, has a sturdy build quality, and is ver simple and straight forward to use.
This Model's Rating
This is a good saw for any non professional. Professionals who use a reciprocating saw all day will obviously want a bigger and better saw, but for the DIYers out there, this is the perfect reciprocating saw.
This Power Tool's Rating
When I had a small portion of a wall to remove when remodeling our kitchen, I tried using a variety of tools and methods to quickly and accurately complete the job. I soon threw in the towel and went to our local hardware store where I found this saw. Using a reciprocating saw made the demolition so easy I fininshed the job in less than half the time it would have taken me otherwise. I soon found other uses for the saw around the house, making it a money-wise decision to purchase it.
Being the entry level, "lite" saw offering, the DeWalt DW304PK weighs in at a respectable 7 lbs. I would not call it light or heavy, but manageable. It is light enough to be used over the head for short periods of time without leading to arm fatigue but heavy enough to let you know it is well built and not flimsy.
The variable speed trigger is useful, but I usually end up squeezing the trigger all the way down as I am using the saw. It takes a little practice to get good at accurately controlling the speed, but I have not found it to detract from the overall usefulness of the saw.
What I Like
- Rugged and durable build quality
- Keyless / Tool less blade change
- 4-position blade clamp
What I Dislike
- Probably not powerful enough for professional use
Summary
I think this is the perfect saw for any homeowner or DIYer who needs a reciprocating saw for those occasional demolition or construction tasks. It is moderately inexpensive, has a sturdy build quality, and is ver simple and straight forward to use.
This Model's Rating
This is a good saw for any non professional. Professionals who use a reciprocating saw all day will obviously want a bigger and better saw, but for the DIYers out there, this is the perfect reciprocating saw.
This Power Tool's Rating
When I had a small portion of a wall to remove when remodeling our kitchen, I tried using a variety of tools and methods to quickly and accurately complete the job. I soon threw in the towel and went to our local hardware store where I found this saw. Using a reciprocating saw made the demolition so easy I fininshed the job in less than half the time it would have taken me otherwise. I soon found other uses for the saw around the house, making it a money-wise decision to purchase it.
Sunday, May 3, 2009
How To Change a Thermostat on a V6 Ford Ranger
A car's thermostat controls the flow of coolant to keep the engine in its prime operating temperature. Thermostats can become stuck in either the open or closed position. In either case, it will need to be replaced.
I noticed the temperature gauge needle never got off the very bottom mark unless I drove on the interstate for over 20 minutes. Even then, it barely got above the cold mark. I knew either the thermostat or the temperature sending unit were bad. Since I was flushing my cooling system, I decided to go ahead and replace the thermostat to see if it would fix my problem. Thermostats are inexpensive (around $5), so well worth the price to "throw parts" at a problem to see if the problem can be fixed.
Troubleshooting the Thermostat
A working thermostat will let the engine get into its normal operating temperature within a few minutes of running and keep it there. You will also be able to get heat from the HVAC controls relatively quickly. If your car has a problem with any of these, the thermostat may need to be changed.
The thermostat may be stuck open if...
Tools and Materials
Changing the Thermostat
A good time to change the thermostat is when the cooling system is empty, like during a coolant system flush. It is possible to change the thermostat with a full cooling system but some coolant will leak out of the disconnected hoses.
Follow these photos and captions for the thermostat changing instructions on a 1996 4.0L Ford Ranger:
I noticed the temperature gauge needle never got off the very bottom mark unless I drove on the interstate for over 20 minutes. Even then, it barely got above the cold mark. I knew either the thermostat or the temperature sending unit were bad. Since I was flushing my cooling system, I decided to go ahead and replace the thermostat to see if it would fix my problem. Thermostats are inexpensive (around $5), so well worth the price to "throw parts" at a problem to see if the problem can be fixed.
Troubleshooting the Thermostat
A working thermostat will let the engine get into its normal operating temperature within a few minutes of running and keep it there. You will also be able to get heat from the HVAC controls relatively quickly. If your car has a problem with any of these, the thermostat may need to be changed.
The thermostat may be stuck open if...
- The engine takes a long time to heat up - indicated by either the temperature gauge not wanting to leave the "C" or "Cold" mark. (Check to make sure the Temperature Sending Unit is working properly, as this may cause an incorrect temperature gauge reading).
- It takes a long time to get heat from the HVAC.
- The upper radiator hose never gets hot, even after the vehicle has been driven for several miles.
- The engine overheats after a consistant amount of time driving, shortly after starting the engine and no leakage can be found from the radiator, hoses, head gasket, or heater core.
Tools and Materials
- 10mm socket (1/4" drive)
- 1/4" ratchet (there is not enough clearance for a 3/8" ratchet)
- Small 1/4" extension
- 10mm combination box-end and open-end wrench
- New thermostat with gasket
- 50/50 mix of coolant and water to top off the radiator if any spills out during operation
Changing the Thermostat
A good time to change the thermostat is when the cooling system is empty, like during a coolant system flush. It is possible to change the thermostat with a full cooling system but some coolant will leak out of the disconnected hoses.
Follow these photos and captions for the thermostat changing instructions on a 1996 4.0L Ford Ranger:
Locate the thermostat housing by following the upper radiator hose to where it connects with the engine block.
Here you can see the thermostat housing tucked away.
You will have an easier time accessing the thermostat by removing the throttle cable splash shield and disconnecting the electrical connector that goes into the air intake. You can also completely remove the air intake hose, but I opted not to.
You will need to remove these two 10mm bolts.
And there is one more underneath.
Here is the thermostat (red arrow). The blue arrow shows the Temperature Sending Unit which controls the temperature gauge. The TSU will always have one wire coming out of it. The green arrow shows the Temperature Sensor, this sensor tells the car's computer how hot the coolant is. This sensor will always have two or three wires coming out of it.
Remove any old gasket material from the hose side and engine side of the thermostat housing.
Here is the new thermostat with rubber gasket installed. Note how it is installed. The spring side should go towards the engine.
To finish: follow the steps in reverse.
Before it took a lot of driving to even move the temperature gauge needle on my truck, now the truck warms up quickly and stays in the normal temperature range like it should. This should help keep the engine running well, improve gas mileage, and keep emissions low.
Saturday, May 2, 2009
How To Flush Your Car's Cooling System
Flushing the coolant in your vehicle's cooling system is a great step in maintaining a healthy engine. A failure in the cooling system can easily result in an engine damaged beyond repair and a wallet much, much lighter. Luckily, servicing a car's cooling system is easily within the grasp of the backyard mechanic. Spring and Autumn or good times to check your cooling system.
Take a moment to familiarize yourself with how your car's cooling system works. Below is a diagram illustrating a typical cooling system with the major parts of the system highlighted and explained.
The heart of any cooling system is the radiator. This large, flat tank of coolant is positioned at the front of your vehicle, just behind the grill. The radiator has many small channels that coolant flows through to dissipate heat. Directly behind the radiator will be one or two fans which help the radiator cool the antifreeze.*
On most vehicles, there will be a radiator cap on top of the radiator, on some, the cap is on the coolant recovery reservoir.
Cold coolant is pulled by the water pump, through the lower radiator hose, and into the engine. The coolant circulates throughout the engine, keeping it from overheating.
When the engine has reached normal operating temperatures, the thermostat opens, allowing the hot coolant to flow from the engine back to the radiator where it is cooled again.
When you turn the heat on inside your car, coolant flows from the engine into the heater core. The heater core is sort of like a miniature radiator located inside the dashboard that uses the heat from the coolant to warm the air in the car's cabin.
*The term coolant and antifreeze are interchangeable. This fluid has four main tasks: cool the engine, keep from freezing, keep from boiling, and keep the system from corroding.
What Type of Coolant/Antifreeze Should I Use?
Today's coolant market is confusing. In days past all coolant was the green ethylene glycol variety, but not anymore. Now it seems that every car manufacturer has at least one color of coolant. There are extended life coolants that now claim to go up to 150,000 miles before they need to be flushed and there are several "All Makes, All Models" type of coolant on store shelves. Which to use? Here is a pdf that has some good, technical information. If you want my simple answer, I would recommend using whatever coolant came with your vehicle. If you cannot find that or do not know, you can always use the tried and true green ethylene glycol. The only major drawback with the green stuff is its short 2 year coolant change interval, but even then, this short flush interval forces you to keep on top of your cooling system's maintenance, so I am not even sure that it is a drawback.
Common Problems With the Cooling System
Normally, your car's cooling system will work flawlessly for many years, but when a problem does occur, it is usually one of these:
There are four main steps in servicing the cooling system:
You do not need much to flush your cooling system.
Flushing the Heater Core
Flushing the Coolant Reservoir
Before proceeding to refilling the system with fresh coolant, make sure all hoses and drains are secure. Also, if your car is older, now may be a good time to do a little preventative maintenance and replace the thermostat.
Filling the System
There you go! I would keep an eye on the coolant level periodically for the next couple of days. If you think there may still be air in the system, you can purge it out by running the engine with the cap off the radiator.
Disposing of Used Coolant
"How do I properly dispose of used auto coolant?" This is a common question. The answer is to find out what your local laws are. Some recycling or hazardous materials centers will accept used coolant as will some auto parts stores. In some places, you can drain used coolant into the sewer as long as that sewer goes directly to a sanitation plant. In any case, always follow these guidelines:
I mentioned some other methods of flushing the coolant system. One simple way is to do a radiator drain and refill, then drive the car for the day, then repeat a few more times. However, using this method will not get the heater core or coolant reservoir properly flushed.
Another method is to purchase a flushing kit. These kits include a 'T' adapter that you install by cutting one of the hoses going to the heater core. Then you attach a garden hose and run the engine while the water purges all the old coolant out of the radiator. Finally, you add straight (not pre-diluted) coolant to the radiator until the proper mix is attained. This process does a good job of flushing, but you end up with tap water in your cooling system. I would personally not want all the hard minerals found in most tap water clogging up my radiator, so use distilled water when possible.
Take a moment to familiarize yourself with how your car's cooling system works. Below is a diagram illustrating a typical cooling system with the major parts of the system highlighted and explained.
The heart of any cooling system is the radiator. This large, flat tank of coolant is positioned at the front of your vehicle, just behind the grill. The radiator has many small channels that coolant flows through to dissipate heat. Directly behind the radiator will be one or two fans which help the radiator cool the antifreeze.*
On most vehicles, there will be a radiator cap on top of the radiator, on some, the cap is on the coolant recovery reservoir.
Cold coolant is pulled by the water pump, through the lower radiator hose, and into the engine. The coolant circulates throughout the engine, keeping it from overheating.
When the engine has reached normal operating temperatures, the thermostat opens, allowing the hot coolant to flow from the engine back to the radiator where it is cooled again.
When you turn the heat on inside your car, coolant flows from the engine into the heater core. The heater core is sort of like a miniature radiator located inside the dashboard that uses the heat from the coolant to warm the air in the car's cabin.
*The term coolant and antifreeze are interchangeable. This fluid has four main tasks: cool the engine, keep from freezing, keep from boiling, and keep the system from corroding.
What Type of Coolant/Antifreeze Should I Use?
Today's coolant market is confusing. In days past all coolant was the green ethylene glycol variety, but not anymore. Now it seems that every car manufacturer has at least one color of coolant. There are extended life coolants that now claim to go up to 150,000 miles before they need to be flushed and there are several "All Makes, All Models" type of coolant on store shelves. Which to use? Here is a pdf that has some good, technical information. If you want my simple answer, I would recommend using whatever coolant came with your vehicle. If you cannot find that or do not know, you can always use the tried and true green ethylene glycol. The only major drawback with the green stuff is its short 2 year coolant change interval, but even then, this short flush interval forces you to keep on top of your cooling system's maintenance, so I am not even sure that it is a drawback.
Common Problems With the Cooling System
Normally, your car's cooling system will work flawlessly for many years, but when a problem does occur, it is usually one of these:
- Leaking coolant (external) - a cracked radiator or old hose can cause coolant to leak. Replace any worn hoses or repair/replace the radiator.
- Leaking coolant (internal) - if your coolant level is dropping but you do not see any signs of external leakage, check the condition of your oil. If the oil is milky, then you have a blown head gasket.
- Leaking coolant (general) - if the coolant is not leaking out externally or internally, have your radiator cap pressure tested. A bad radiator cap may let steam escape, thus lowering the level of coolant.
- Coolant does not get cold - A broken fan clutch (if your fan is belt driven) or an electrical problem (if your fan is electrically driven) can disable the fan.
- Engine overheats - There can be many causes of this. First, check the coolant level in the radiator. Next, check for any liquid leaking out of the weep hole in the water pump; leakage here indicates a bad water pump. If the water pump and coolant levels are good, check the thermostat. A thermostat that is stuck closed will not allow coolant to circulate. When the engine is warm, feel the upper radiator hose. If it is hot, then the thermostat is not stuck closed.
- Engine takes a long time to get to operating temperature - The thermostat is stuck open, replace the thermostat.
- There is no heat coming out of the vents - A thermostat that is stuck open will increase the time it takes to get hot air out of the vents. If you do not get any hot air, the heater core may be plugged or bad.
- Coolant is leaking into the front passenger leg area - The heater core is clogged.
Flushing the Coolant on a 1996 Ford Ranger
Here is the method I used on my Ranger to service the cooling system.
There are several methods available.
There are four main steps in servicing the cooling system:
- Flush the radiator
- Flush the heater core
- Flush the coolant recovery reservoir
- Fill the system
You do not need much to flush your cooling system.
- The proper amount of coolant and water (check your owner's manual to find the cooling system's capacity)
- Pliers or screw driver to remove hose clamps
- Hose to direct draining coolant into proper container
- Large bucket or container to drain coolant into
- Garden hose attached to a water supply to flush the system
- Funnel to fill the radiator
- Chemical Cooling System Flush (optional) if your cooling system is very corroded or dirty, you may want to use a cleaner.
- Start by removing the radiator cap.
- Locate the radiator drain (on side of radiator, passenger side)
- Attach a 3/8" inside diameter hose onto the drain nipple and route the hose into a large (4-5 gallon minimum) container.
- Unscrew the draincock enough to let coolant drain from the radiator. You do not have to remove it. (If your car's radiator does not have a drain, you can disconnect the lower radiator hose to drain the radiator).
- When coolant stops draining, use a garden hose at the radiator cap to flush the radiator. When the fluid coming out is clear, the radiator has been flushed. Let all the water drain, then tighten the draincock. Compare the color of your coolant to new coolant. If the old coolant looks good, then proceed to the next section. If the old coolant is rusty, or if chunks of rust and corrosion came out with the flush, you may consider using a chemical flushing agent to clean your radiator. Follow the manufacturer's instructions. On my truck, the old coolant looks really good, so I did not use any chemical cleaners.
Flushing the Heater Core
- Locate the heater core inlet and outlet hoses. These two hoses will be located at the passenger side firewall. Follow the hoses to determine which is the inlet and which is the outlet. The inlet hose will come from the engine or thermostat; the outlet will come from the water pump.
- Detach both hoses. Route the outlet hose so that it will empty into the drain container (I rigged up a drain pipe and hose).
- With the garden hose, spray water into the inlet hose until the fluid draining from the outlet hose is clear. Alternate between a steady stream and short bursts to help dislodge any build-up inside the heater core.
- Back flush the heater core by switching which hose drains and which you spray water into.
- This step is optional, but you can repeat step #3 one more time.
- Reattach the hoses, making sure they are properly routed (you do not want to get the inlet/outlet switched).
Flushing the Coolant Reservoir
- Locate the end of the reservoir hose attached to the radiator pressure cap. Remove the hose from the cap and unclip it from the top of the radiator.
- Route the hose so that the fluid drains into the drain container.
- Open the coolant recovery reservoir cap. If the inside is fairly clean a simple garden hose flush is all that is needed. If there is a lot of scale and corrosion build-up, you may need to use a household cleaner to help get the tank clean. The reservoir on my truck had a bit of sediment in it, but not much.
Before proceeding to refilling the system with fresh coolant, make sure all hoses and drains are secure. Also, if your car is older, now may be a good time to do a little preventative maintenance and replace the thermostat.
Filling the System
- Slowly add a 50/50 mix of antifreeze and water (distilled is preferrable) to the radiator. Use a large funnel. When done, leave the funnel in place.
- When the radiator will take no more coolant, fill the reservoir to the "COLD FILL" line.
- Set the heat controls all the way up.
- Start the engine and let it run for 10 minutes AFTER it gets to operating temperature.
- Shut the engine off and let it cool down. Add more coolant as necessary and reinstall the radiator cap.
There you go! I would keep an eye on the coolant level periodically for the next couple of days. If you think there may still be air in the system, you can purge it out by running the engine with the cap off the radiator.
Disposing of Used Coolant
"How do I properly dispose of used auto coolant?" This is a common question. The answer is to find out what your local laws are. Some recycling or hazardous materials centers will accept used coolant as will some auto parts stores. In some places, you can drain used coolant into the sewer as long as that sewer goes directly to a sanitation plant. In any case, always follow these guidelines:
- NEVER empty into a storm sewer or drain that does not end at a sanitation plant (septic systems are unacceptable!).
- NEVER pour into the ground.
- NEVER leave antifreeze uncovered - children or animals can be attracted to its sweet scent and taste and drink it, this is VERY dangerous and can be fatal!
- ALWAYS find out what the local laws are for properly disposing used coolant.
I mentioned some other methods of flushing the coolant system. One simple way is to do a radiator drain and refill, then drive the car for the day, then repeat a few more times. However, using this method will not get the heater core or coolant reservoir properly flushed.
Another method is to purchase a flushing kit. These kits include a 'T' adapter that you install by cutting one of the hoses going to the heater core. Then you attach a garden hose and run the engine while the water purges all the old coolant out of the radiator. Finally, you add straight (not pre-diluted) coolant to the radiator until the proper mix is attained. This process does a good job of flushing, but you end up with tap water in your cooling system. I would personally not want all the hard minerals found in most tap water clogging up my radiator, so use distilled water when possible.
Friday, May 1, 2009
Remodeling the Kitchen - Part 5
Installing Ceramic Tile
In Part 1 of our kitchen remodeling adventure we saw what we had to work with.
In Part 2, we came up with a plan and started demolition.
In Part 3 we installed the subfloor and removed part of a wall.
In Part 4 we prepared the subfloor for the tile by laying cement backerboard.
In this Part we will install the ceramic tile!
Before a single tile can be installed it must be purchased. Sounds simple, right? It is simple if you know what to buy. There are a couple of things to keep in mind when purchasing tile for your renovation project.
- Size of the tile
- Type of tile
- Color of tile
- Tile layout plan
*Remember to purchase floor tiles; floor tiles are thicker and provide better traction than wall tile.
.The size of the tile depends on the size of the room it will be installed in. If the tiles are too small for the room the percentage of grout lines to tiled floor could become too high and create a distracting pattern. On the other hand, tiles that are too large for the room can also look out of place. If you are not sure what size tiles you want there are a few things you can do that will aid your decision:
- Ask an employee at a tile shop or home improvement center for advice
- Look at other tiled rooms or rooms with vinyl floors with tile patterns
- The most common tile size for most medium sized rooms will be about 12"
- Smaller rooms, such as bathrooms, usually have 6" - 12" tiles
- Large rooms with lots of open space can have 17" or larger tiles
We decided to use the simple grid pattern because it matched the simple country look we wanted for our new kitchen.
After finding the perfect tile at the perfect price at a home improvement store, we put the 1/2+ ton of tile, mortar, and grout in the back of our truck and drove home, eager to finally have a real floor in the kitchen.
The Layout
You want the tile to be centered and run square to the room. It will be noticeable if it is off center or is not square to the room.
1. Measure along one of the walls and find the center point. Mark this point, then do the same with the opposite wall. When you have the two points marked, snap a chalk line between the points, essentially dividing the room in half. Do the same with the other two walls. You should now have two chalk lines running perpendicular to each other and intersecting in the center of the room.
2. Dry lay a row of tiles along each chalk reference line. Keep in mind to leave a gap between the tiles the same distance you want your grout line thickness to be. We used 1/8" plastic tile spacers (sold at hardware stores) to ensure an even gap.
3. Adjust the reference lines as needed to best center the tiles in the room.
Material List
- Tile - you should have 10% more than you need (i.e. if you are tiling a 300 sq. ft. area, you should have 330 sq. ft. of tile on hand).
- Thinset mortar - Use gray if the grout will be dark or white if your grout will be light.
- Grout - There are many color options.
- Grout Sealer
- Silicon Caulk
- Wooden Board
Tool List
- Level - We used a 4' level.
- Goggles - When cutting tile
- Respirator - When cutting tile
- Knee Pads - You will definitely want these!
- Tile Cutter - For making straight cuts along the entire length of a tile.
- Wet Tile Saw or Angle Grinder with Diamond Cut-Off Wheel - For making non-straight cuts.
- Clamps - For holding tile while cutting it.
- Rubber Mallet
- Tile Spacers
- Sponges
- Clean Rags
- Rubber Grout Float
- Notched Trowel - For spreading thinset mortar
- Chalk Line - For making your reference marks.
- Tape Measure
- Large Bucket or Pan - to mix mortar and grout in.
- Caulk Gun - For caulking the perimeter of the room after the tile is laid.
- Mortar and Grout Mixer
Installing the Tile
The chances are astronomically high that at some point you will have to cut a tile to fit a space. I will discuss that later in this post, but for now I will guide you through the process we used to lay our tile floor.
1. First you need to get your thinset mortar prepared. Mix the mortar in a large pan or bucket with water until it is the consistency of thick, creamy peanut butter.
2. We started at the center (where our new chalk reference lines were) and worked in one quadrant of the room at a time. Spread some mortar onto the floor with the notched end of your trowel. There should barely be any mortar in the valleys created by the notched trowel. You should spread it so that the notches create even rows.
3. Firmly place the first tile down. Start laying the tile out, using the spacers in between them, being careful to keep the tiles lined up with each other. Clean any mortar that oozes out in between the tiles.
4. Once you get several tiles laid in an area, use a board and rubber mallet to set the tile. Place the board across several tile and hit it with the mallet. Do not strike too hard or else you may end up cracking a tile, you only need enough pressure to ensure the tile is firmly set in the mortar.
5. Once all the full sized tiles have been installed, it is time to start cutting tiles to finish the job.
*We laid all the full size tiles in one quadrant of the room and then cut the odd sized ones to finish the quadrant before moving on. I ended up being the tile cutter and my wife was the tile layer. Having these roles helped the work flow smoothly and accurately.
*We still had a problem with one area of the floor that had a high ridge. When we installed the backerboard we tried to smooth this high spot out as much as possible by using additional mortar. We had to do the same thing with the tile. It actually worked very well and that spot which was once noticeably higher than the surrounding floor is all but a foregone memory.
Cutting the Tile
There are two basic types of cuts, full length straight cuts and irregular cuts. The fastest and easiest way to make the full length straight cuts is to use a tile cutter. This tool scores the tile and then snaps it along the score line. After looking at the outrageous prices to buy a wet tile saw and the moderately high price to rent one, I decided to try a different method for cutting the irregular shaped tiles. I purchased an inexpensive ($14) diamond cut-off wheel that fit my 4 1/2" angle grinder. This worked perfectly and for a tiny fraction of the cost of a wet saw!
Most of your cuts will probably be straight cuts to get a thin piece of tile to fit between the wall and the last full tile. Luckily, these are very easy cuts to measure for:
- Line up and place a full size tile on top of the last full tile in the row.
- Place a tile vertically against the wall.
- Place another full tile on top of the tile from step 1, but move this tile over so one of its edges is flush against the the vertical tile.
- Using this tile as a guide, draw a line on the tile from step 1. This is your cut line.
- Use the tile cutter to score the tile along the line and then snap it. The piece you cut will fit perfectly!
- Use a file (you can find specialty ceramic tile files at most hardware stores) to remove the sharp edges from the cut.
- Using a tape measure and pencil, measure and mark the part of the tile that needs to be cut.
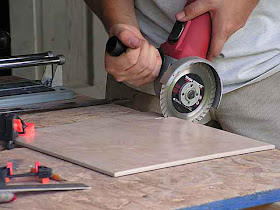
- Clamp the tile to a work surface. I placed two small pieces of plywood across two saw horses. Having two pieces of plywood allowed me to use a clamp between the plywood pieces to hold the rear of the tile down.
- If the cut lines are straight, cut along one line with the grinder, then rotate the tile and cut along the other line(s).
- If you need to cut a semicircle shape out of a tile, you can make cut multiple straight cuts to remove the bulk of the semicircle. Then use the tip of the diamond wheel to form the circle's edge.
The Tile is Installed, Now What?
Your back and knees are probably sore from all the hard work, so take a 24 hour break, you have earned it! Soak your knees and get a back massage.
Let the tile set overnight (at least 8 hours, we waited longer) so the mortar has enough time to fully set. Avoid walking on the tile for this time.
The next step is grouting the joints.
The Next Step: Grouting the Joints (See, I told you so)
Break time is over! We were exhausted after installing the ceramic tile in our kitchen and breakfast nook. We started early the morning of July 4th (it is nice having the day off work) and worked till midnight. We then had to work most of Saturday as well just to finish laying the tile. The last thing we felt like doing was getting back on our knees to do the grout, but it is the last major step of installing tile.
- To ensure an even color, mix all the grout together at once. It should be the same thickness (like peanut butter) as the thinset mortar mixed earlier.
- Apply the grout by spreading it over the tiles with the rubber grout float held at a 45 degree angle. The grout should flow into the joints and fill them and the rubber grout float should keep the surface of the tile relatively clean. Do not grout the outside perimeter of the room where the floor and walls meet.
- Run the rubber grout float over the floor again to clear any grout that is not in a joint. Make sure all the joints are full of grout.
- Use an old tooth brush or other small brush to shape the grout.
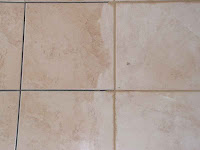
- Wait 20 minutes, then wipe the tiles off with a damp sponge. Have a bucket of water handy to keep the sponge moist.
- Let the grout cure for a week to ten days. During this time it is safe to walk on the floor but try to do as little as possible. The grout will be especially susceptible to staining at this point.
- After the grout has cured, apply grout sealer. There are several methods of application, we chose to purchase an inexpensive applicator which is nothing more than a small bottle with a little wheel that controls the flow of sealant. Read the instructions on the sealer for directions.
- Apply silicone caulk around the outside perimeter of the room. I found it helpful to use painter's tape to tape off the floor and wall to make cleaning excess caulk an easy task.
- Once the grout sealer and silicone caulk have dried you can mop the floor with specialty tile cleaner to remove any trace of grout or dust from the installation.
*******
At last, we finally had a real floor to walk on! It was worth the time and effort to tile these rooms ourselves. Our total cost for laying almost 300 sq. ft. of porcelain ceramic tile was right around $600. That included all the materials, supplies, and tools. I only lost two tiles during the whole install, so we have two or three full boxes of tiles in a closet that we can keep in case we ever need to repair a section of the floor.And of course, a couple of photos of the finished floor:
But wait! Our kitchen remodel is not yet done! Things are about to get very interesting...